The sun is shining and the weather outside does not call for a sweater. Nevertheless, the temperatures will drop and soon the trees will reenact their annual fiery show while dressed in beautiful shades of orange,reds and yellows making us forget all about summer and its glory.
 |
|
Pottery Barn Resin antler Craftberry Bush Clay antler
|
In preparation for the ‘show’ I have been working on some projects to cozy up our nest and this one in particular was an inspiration from Pottery Barn and their fall decor.
Pottery Barn is always a great place to find inspiration for any holiday and I have been particularly attracted to the resin deer antlers in their fall decor this year. But as usual, the DIYer in me cannot justify spending $52, so I decided to make my own and share the ‘how to’ with you.
Materials
y-shaped branch (optional)
Tin foil
Paint (optional)
I used DecoArt – Antique Gold
Antique White
Raw Umber
Let’s get started….

(click on picture to enlarge)
1) If you choose to use a branch, find a branch that simulates an antler
2) Sand any knots and with an exacto knife, sharpen the tips of the branch as shown
3) It should look like a sharpened pencil
4) With your clay, cover the entire surface of the branch

(click on picture to enlarge)
5) Using clay, add additional peaks to the existing branches like shown
(OPTION 2.- using tin foil)
(OPTION 2.- using tin foil)
6) With tin foil, form the shape of the antler by rolling and scrunching the foil paper. You can make as many peaks as you want.
7) With clay, cover the entire surface of foil (I found the foil paper much easier to cover than the branch). If you are using self drying clay, dip your fingers in water and run them along the surface to get rid of any bumps and smoothen. It doesn’t have to be perfect as you will sand it once it is dry.
8) Prop against any item so antler dries in desired position. I used smooth rocks to prop it up.

(click on picture to enlarge)
9) While clay is still wet, use toothpick or any other sharp point to make little ridges or indentations.
10) I used a hard bristle paint brush and stippled the ‘marrow’ at the bottom of the antler. I also ran it along some of the area to make some areas look porous.
11) Allow clay to dry (note: it may take upwards of 24 hours) and you might have to turn it over to ensure it dries evenly.
12) Gently sand antler with fine grit sand paper and if desired, paint and gloss.
And that’s it!

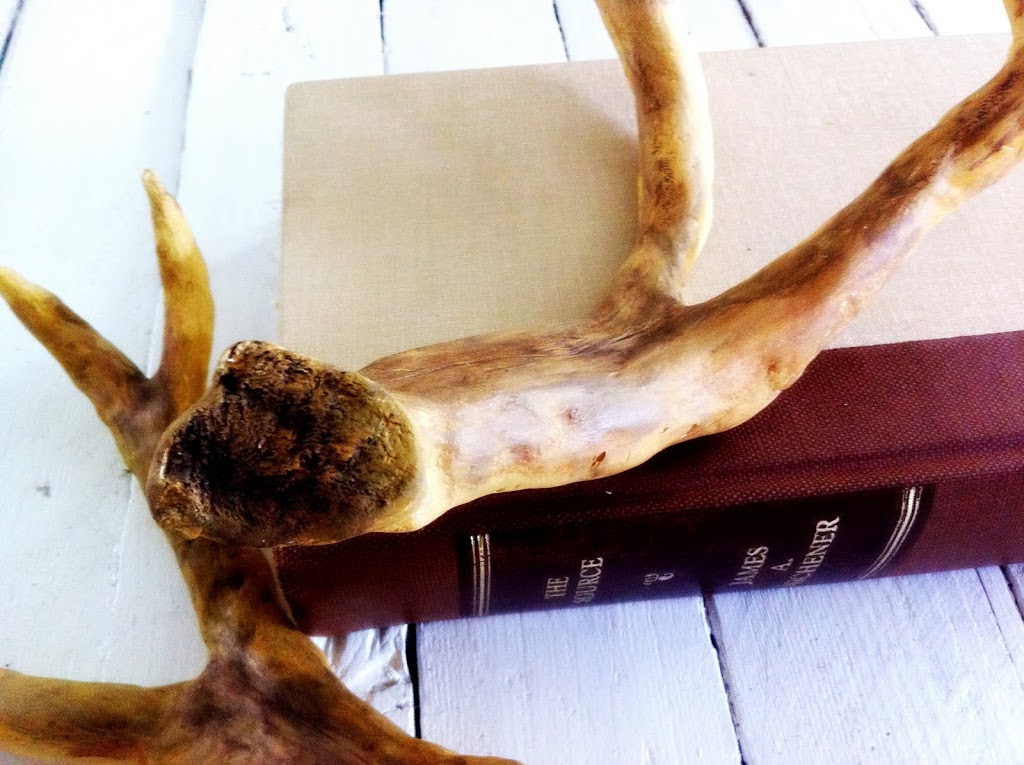
I wasn’t convinced I would keep the antlers white, so I snapped a few pictures prior to painting them. I find seeing pictures of my crafts helps me to determine what I like better and it also allows me to see more clearly any areas of, shall we say, improvement.

See how realistic the marrow looks
by stippling it with a brush?

This is what I mean when I can see ‘areas of improvement’ . From the picture, I can see that if I want to keep these white I will have to sand them down a little more and make them smoother.
Can you picture these mounted on a piece of white wood and hanging on the wall. What do you think, do you like them white, or….

Here they are painted. I applied a coat of the Americana Antique white and allowed it to dry. I then painted it with antique gold and quickly wiped it off so you could see a tint of it. Lastly, I dry brushed raw umber to ridges and the marrow and rubbed it off with a clean cloth.

In the pictures, the antlers appear to be made out
of wood but are more realistic looking ‘in person’.


Total cost – $3.95, which was the cost of the air drying clay and I only used half of it. The project overall is fairly easy, as nature is not perfect and the imperfections make it look more realistic.
Well friends, that’s it from me for today but please note that :
NO DEERS WERE HARM IN THE MAKING OF THIS POST 😉
Have a beautiful day!
much love,
Lucy

While fooling around with my antlers, my son took this picture with the iPhone.
Not the most flattering picture, but just had to share…:)


Adorable picture of you. I would have never guessed clay. I was thinking driftwood. Great job.
Super clever and beautiful!
This is sooooooo funny!!!!!! What a great project
This is awesome! I need to try this asap!
lucy–i seriously thought they were real antlers!! oh my goodness, so so so so so smart! clay on twigs–awesome! your paint job was spot on, i would love these in my home..i may be sending you a special order 😉
love them!
I saw these at CSH, and am “featuring” them tomorrow. So amazing, Lucy. I’m copying these for sure ;O).
SO awesome……….great tutorial Lucy!
Genius idea! Such a great tutorial! I was at the beach this summer and saw piles of driftwood and was thinking about what I could do with it. This may just be the thing.
Thanks for the inspiration, Rachel
http://www.holy-craft.blogspot.com
That looks amazing. I’m just blown away with how real it looks.
Soooo creative! I love this project.
xo,
Sherry
That is beyond amazing! wonderful work and great post!
That is so cool!! I can`t believe the texture that you mimicked, they look so real 🙂
by the way, love the pair you`re sporting :))
have a great week
hugs
Manni
this is fabulous! i love the antler look, so i will have to give this a try. amazing job.
kellie
Okay…you amaze me! Those look so awesome, Lucy. I really love them painted 🙂
This is amazing! I pinned, tweeted, facebooked and stumbled this. Seriously, wow.
They look so real! Great idea! Save the deers! Thank you for sharing this tutorial!
Dania
wow, I’m impressed.
aaackk!!! LOVE these, very cool!
Wow! I am very impressed with your creativity. Never in a million years would I have thought of doing that but I wish I had. Very nice!—— Shannon
Great project! They look fantastic. Although, I have to tell you that collecting antlers won’t “save a deer” – they shed them naturally every fall. No need to kill a deer to have antlers in your home. 🙂
Lol, thank you Sneaux..:) the ‘save a deer’ was my poor attempt to humor…:) thanks for stopping by! Xo
Lucy
This is a project that requires dedication. Good for you and love the idea!
This is AWESOME! Thank you for this post!
I love antler ‘stuff’ but dont want to spend a gazillion dollars on it. What a great idea. I’m going to give it a try!
Emily
Wow — I just stumbled upon your site today and am amazed at your cost-friendly, wonderful projects. I’ve signed up to receive your posts! I can’t believe you were able to replicate these antlers so well and love our “no deers harmed” policy!
wow Lucy
That is so cool…your good at this stuff I like the atlers a lot
KAT Happy Autumn
wow great job! when I first saw it I thought it was real till I kept reading!
Wow, really great job. Congrats.
Wow thanks for the tutorial its really detailed. they look amazing and so real i will have to go on the hunt for some branches lol. i really like it thanks from aimeemakeshomemade.blogspot.com
My clay is on a windowsill drying! Can’t wait to finish it. Do you know how long air drying clay normally takes to dry? X
This is such a great idea! My grandson has recently become interested in deer hunting and this would be a great project for him.
Wow i would of never guessed this is GREAT job wel done!
Noon
Thanks for the advice! Worked wonderfully! My lovely new antlers are sitting on my sideboard looking very realistic! x
WOW! These are so impressive! This is such a great idea!!!!
LOVE these..oh my goodness you are soooo clever. We do not have deer here on PEI so antlers are few & far between, let alone the fact i would hate to lose a deer to get decorations for my house. great job !!
I love your blog! I just finished creating my own antlers and everybody thought they were real…thanks for the tutorial. Have a great day…
Wow these are awesome! You are very talented and creative!
Impressive! Wow, nice work!
You are a genius! Making this one for sure!
Wow! MILF alert!
WOW They Look Soooooooo Real !!!
Sigh….I’m in love with these and pinning! You are so creative!
These are really beautiful and so well made, but ‘save a deer’? C’mon, really?
HI…you did a great job.I am writting you from Northern Canada.Just a note tho,if you live near some deer herds the bucks natually shed the antlers once a year.It does not hurt them.The bigger “the sheds,the older the buck.So if you are lucky enough to live in that area,get on the hiking boots and go on a treasure hunt.Love from Spiritwood.
Wow! Love them painted! Thanks for sharing
I think these are so realistic and beautiful and was thinking about making an antler wreath using your technique. I read somewhere that air drying clay cannot be hung on the wall, but I am wondering if you think if I fastened all the antlers to a frame of sorts if the antler would be strong enough to adhere to a frame, then I can attach the frame to the wall?
Something your can really brag about…down to the stippling on the marrow!
So, I really want to make antlers for a costume event I’m going to, and I’ll need to wear them on my head almost all day. Since the rest of my outfit is very elegant and gothic, I’ve been looking for a tutorial for realistic looking antlers so I don’t have to but cheap tacky party shop antlers. But I was wondering: Are they particularly heavy at all? Could they be fastened to a thick headband and still hold in place or would they just fall?